Building a Secure Virtual Private Cloud (VPC) in AWS: A Step-by-Step Guide
Introduction
As businesses increasingly move to the cloud, security remains a top priority. One of the most effective ways to ensure your AWS infrastructure is secure is by setting up a Virtual Private Cloud (VPC). A VPC provides a private, isolated network within AWS, allowing you to control your cloud resources and safeguard your applications.
In this blog, we will walk you through the process of building a secure VPC in AWS, including best practices, common pitfalls to avoid, and tips for ensuring robust security.
What is a Virtual Private Cloud (VPC)?
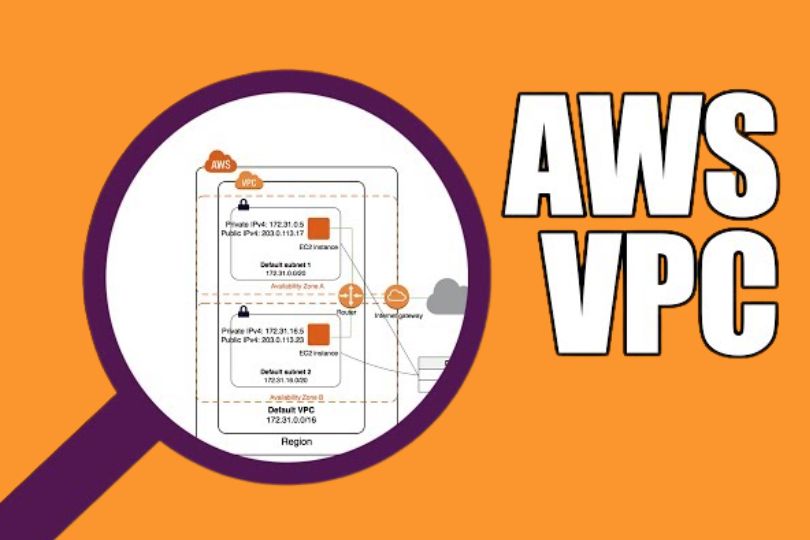
A Virtual Private Cloud (VPC) is a virtual network that you define in AWS. It resembles a traditional on-premises network, but it exists in the cloud. Within a VPC, you can create subnets, configure route tables, manage IP addressing, and set up firewalls.
A secure VPC is essential for ensuring that only authorized users and systems can access your cloud resources, while protecting sensitive data from external threats.
Key Components of a Secure VPC
Before diving into the setup process, let’s review the critical components that make up a VPC:
- Subnets: Logical divisions of your VPC’s IP address range, where you can deploy AWS resources (like EC2 instances). Subnets can be public (accessible from the internet) or private (isolated from the internet).
- Internet Gateway (IGW): A gateway that allows communication between instances in your VPC and the internet. A secure VPC typically uses an internet gateway for public subnets and restricts private subnets from direct internet access.
- Route Tables: These determine the traffic flow between subnets and other resources in your VPC. Properly configured route tables are crucial for security and ensuring network traffic follows the correct path.
- Security Groups: Virtual firewalls that control inbound and outbound traffic to your instances. Security groups are stateful, meaning that if you allow inbound traffic, the response is automatically allowed.
- Network Access Control Lists (NACLs): These are stateless firewalls that provide an additional layer of security at the subnet level.
- VPC Peering: Allows two VPCs to communicate with each other privately. This is important for cross-region or cross-account communication.
- VPN and Direct Connect: These services allow you to securely connect your on-premises network to your AWS VPC using a Virtual Private Network (VPN) or dedicated network link.
Step-by-Step Guide to Building a Secure VPC in AWS
Now that you understand the key components, let’s walk through the steps to set up a secure VPC.
Step 1: Define Your Network Architecture
Before you create your VPC, it’s important to plan your network architecture. Consider the following:
IP Address Range: Choose an appropriate IP range for your VPC (e.g., 10.0.0.0/16). Make sure the range is large enough to accommodate all the resources you plan to deploy.
Subnets: Break down your VPC’s IP range into smaller subnets. Typically, you’ll create multiple subnets for different purposes:
- Public Subnets: For resources that need direct internet access (e.g., load balancers, bastion hosts).
- Private Subnets: For resources that should not have direct internet access (e.g., databases, application servers).
Availability Zones (AZs): AWS VPCs span multiple AZs to provide high availability. Deploy your subnets across at least two AZs for redundancy and fault tolerance.
Step 2: Create the VPC
Login to the AWS Console:
Go to the VPC Dashboard under the Networking & Content Delivery section.
Create a New VPC:
- Select Create VPC and enter the CIDR block (e.g., 10.0.0.0/16).
- Choose IPv4 CIDR and decide if you need an IPv6 CIDR block.
Set Up Subnets:
- Create subnets for each AZ in your region. For example, create public subnets for load balancers and private subnets for databases.
- You’ll need to assign a CIDR block for each subnet (e.g., 10.0.1.0/24 for the first subnet, 10.0.2.0/24 for the second).
Configure Route Tables:
- Set up a route table for public subnets that includes a route to the Internet Gateway.
- For private subnets, you can configure a route table that sends outbound traffic to a NAT Gateway for internet access, or use VPC Peering for communication with other VPCs.
Step 3: Attach an Internet Gateway
Create an Internet Gateway (IGW):
- From the VPC Dashboard, go to Internet Gateways, and select Create Internet Gateway.
Attach the IGW to Your VPC:
- Once the IGW is created, attach it to your VPC to allow communication between instances in your public subnet and the internet.
Step 4: Set Up Security Groups and NACLs
Security Groups:
Security groups act as virtual firewalls for your instances. Create security groups with appropriate rules for each type of resource.
- For public-facing resources (e.g., a web server), allow HTTP/HTTPS traffic from any IP.
- For private resources (e.g., a database), restrict access to only specific security groups or IP addresses.
Network Access Control Lists (NACLs):
- While security groups are stateful, NACLs are stateless. Apply NACLs at the subnet level to add an extra layer of security.
- For example, block inbound traffic from all sources to private subnets but allow outbound traffic to the internet through a NAT Gateway.
Step 5: Set Up a Bastion Host (Optional)
A bastion host is a secure server that you can use to connect to instances in your private subnets. It acts as a jump server, allowing SSH or RDP access to instances in the private subnet without exposing them to the internet directly.
- Launch an EC2 instance in the public subnet.
- Configure the security group of the bastion host to allow inbound SSH access from your IP address.
- Set up the private instances to allow inbound SSH from the bastion host’s security group.
Step 6: Enable Monitoring and Logging
Once your VPC is set up, it’s essential to monitor and log traffic to ensure security and compliance:
AWS CloudWatch: Set up CloudWatch to monitor resource utilization and performance within your VPC. Configure alarms for high CPU usage, low memory, or unusual traffic patterns.
VPC Flow Logs: Enable VPC Flow Logs to capture information about IP traffic to and from network interfaces in your VPC. This is helpful for troubleshooting and monitoring potential security threats.
Best Practices for Securing Your VPC
Here are a few additional best practices to ensure your VPC is as secure as possible:
- Use Multi-Factor Authentication (MFA): Always enable MFA for AWS account access to prevent unauthorized logins.
- Least Privilege Principle: Grant the minimum necessary permissions to users and applications, ensuring that they only have access to the resources they need.
- Private Subnet Isolation: Keep sensitive resources, like databases, in private subnets that cannot be accessed directly from the internet.
- Encrypt Data: Use AWS encryption tools to encrypt data at rest and in transit to protect sensitive information.
- Regularly Audit and Review: Perform regular security audits of your VPC to ensure compliance with security policies and best practices.
Conclusion
Building a secure Virtual Private Cloud (VPC) in AWS is a critical step in ensuring the safety and performance of your cloud infrastructure. By following the steps outlined in this guide, you can create a VPC that is well-architected, secure, and scalable.
Implementing security best practices, using the right AWS services, and continually monitoring your VPC will help safeguard your resources and data in the cloud.
Are you ready to take your AWS security to the next level? Start building your secure VPC today!
Need help with building a secure VPC in AWS? Contact our experts for a personalized consultation or check out our AWS resources for more in-depth tutorials!